You might be a seasoned professional or an amateur starting out. You could be airbrushing a mural, vehicle, cake, body or anything in between and unsurprisingly there are as many airbrushes on the market as there are uses for it it seems. So how do you know what one is right for you?
First of all, how do airbrushes work?
Airbrushes, when connected to an air compressor, work by breaking down the liquid coming through the airbrush into tiny droplets that produce a “spray”. This process is called atomisation. The liquid then comes out as a distinct line, a fine mist, or anything in between.
Atomisation produces a coating that blends and gradients nicely and in ways that other tools such as paint brushes struggle to do or sometimes are not even possible.
There are three different types of airbrushes you can purchase:
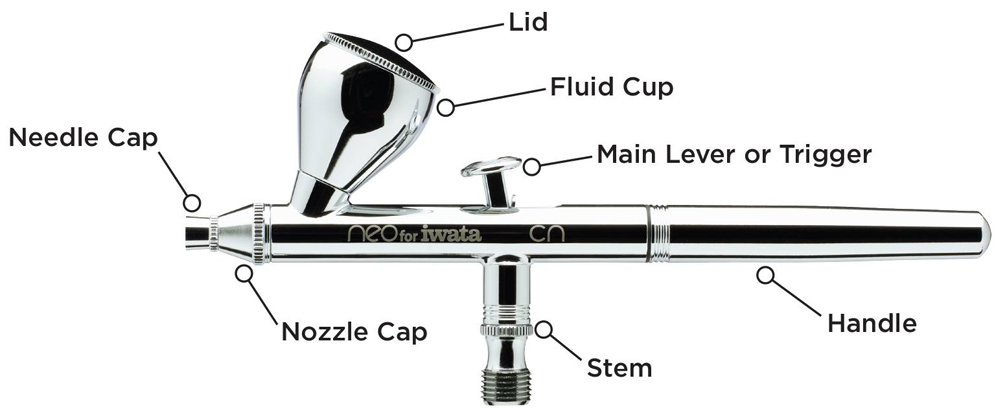
- Gravity Feed – The most popular style of airbrush. The material is placed into a “fluid cup” on the top of the airbrush and the force of gravity helps the material move through the gun. This helps in reducing the amount of material being used, helps in utilising all the material, and allows the airbrush to operate at lower air pressures. This style is generally easier to clean as well.
- Side Feed – This style is used when you want maximum visibility on your job. It draws the material from a side-mounted cup/bottle through the side of the airbrush. They generally can be attached to either the left or right side depending on your job and comfort.
- Siphon Feed – Also known as a bottom or bottle feed. This is generally used for larger jobs with multiple bottles and larger volumes of material. The material is brought up from a jar or cup from underneath the airbrush. In this style the air compressor does all the work, using more air pressure and more material.
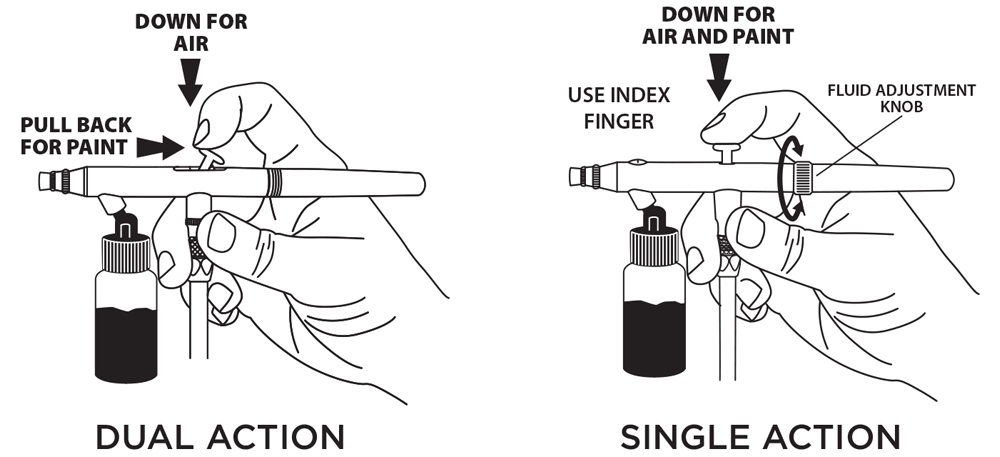
Once you’ve decided what style of airbrush suits you best, you’ll need to decide whether you would like to get a Dual Action or Single Action airbrush.
Dual Action
Also called a double-action airbrush. They allow the user to control both the air and paint flow at the same time. Generally, this is done by pressing down and pulling back the trigger simultaneously. Pulling back the trigger releases the material while pressing down the trigger releases the air. A dual-action airbrush will give the user better control over their work and can create more spray patterns. This is generally a more popular style over the single action.
Single Action
By pressing down on the trigger on a single action airbrush you are only controlling the air. The airbrush features independent controls for the air and the paint. Most single action airbrushes feature a dial on the handle that sets the rate of release of the paint when the trigger is pressed. Less popular than the dual action airbrushes a single action airbrush can be a great first step for users starting out and learning to airbrush. It can also be helpful for people who need a precise spray pattern to be repeated the exact same way time and time again.
https://www.iwata-airbrush.com/airbrush-basics.html
So you have decided which action you’d like to purchase – next is the mixing style.
External Mix
Generally, the second choice the external mix can create a coarser atomisation and potentially uneven spray patterns when compared to an internal mix. This is due to the air and paint being released through two separate channels and are mixed together outside the airbrush (i.e. externally).
Internal Mix
For a more consistent and controlled mix where the air and material are mixed together inside (i.e. internally) the airbrush before leaving it. This also produces a much higher atomisation and even spray patterns. This is the most common style and many manufacturers only will make this style of mixing in their products.
Other Features
There are many other features to consider when it comes to airbrushes whether you are an amateur or professional. Many airbrushes will not come with all of the features below, so it is best to consider what is most important to you, what you are doing and the desired finish you are after.
These additional features can include:
- Do you want a Main Lever (most common airbrush style trigger)? Or a Trigger Style (a front sided ‘spray gun style’ trigger)?
- Do you need a MAC Valve? Also known as the Micro Air Control. Mainly for use by professionals, this feature enables incremental control of airflow for a fine to medium spray and for creating stipple effects.
- Do you need a Quick Flush Cutaway Handle? Or are you happy to manually clean your airbrush? The handle reveals the needle chucking nut in the gun. You can pull that nut back while pushing the main lever down and back when putting a cleaner through the airbrush so you can easily give your airbrush a quick clean without taking it apart.
- Does your job require expert precision? If so do you want a Preset Handle? Also known as a cutaway handle (not to be mixed up with a Quick Flush Cutaway Handle), the Preset handle will limit how far back you can pull the main lever. This allows for a specific line width and spray pattern each time.
- Do you need extra fluid cups? These can come in handy if you have a job that requires both large areas and small detailed areas so that you can get the job done quicker and more efficiently with fewer paint changes.
https://www.iwata-airbrush.com/airbrush-basics.html
Also… WHAT IS A STIPPLE EFFECT AND WHY DO I WANT IT?!
A stipple effect is an airbrushing technique used for creating a texture and gradients of colour pattern that simulates various solidity or shading by using small dots. Simply put, the larger the number of dots in an area, the darker/more colour it shows. The lighter areas or more blended colours use fewer dots and are spaced further apart in an area. There are a few different ways to create this effect both with an airbrush that has the inbuilt ability and without the inbuilt ability. We have found a video on each style for you to check out. There is Airbrush Ways’ “Stipple effect. How to airbrush. A step-by-step guide, for beginners and more.” which you can find here. Or if you would like to watch a technique on stippling without an airbrush that has the inbuilt ability there is ExpertVillage Leaf Group’s “Airbrush Effects: Stippling”.
Anest Iwata’s 5 Ways To Spray
Anest Iwata has helped in creating a blog on airbrushing and separating the uses of an airbrush into 5 stages. To read the full article you can find it here or continue reading below for more information.
The 5 stages according to Anest Iwata are:
#1 Absolute Precision
#2 Total Control
#3 All-Star Versatility
#4 Effortless coverage
#5 Full Finish
Absolute Precision
The finest finishes for extreme detail and used for intricate work. You would be using this style of airbrush generally if you have high-level airbrush skills and know how to confidently care for and maintain your airbrush. This style of airbrush would typically be used for spraying thinner material or reduced paint for optimal flow. The typical sizes of needles for this would be between 0.1mm – 0.25mm.
Total Control
For people who have a beginner understanding to advanced knowledge of airbrushing and need to paint a fine to medium level of detail and scale. According to Anest Iwata this is generally for hobbyists or professional painters. The typical sizes of needles for this would be between 0.2mm – 0.35mm.
All-Star Versatility
The medium-range sized nozzles are ideal for fine to wide levels of detail and scale and is perfect for beginner to high-level airbrush skills. This is the perfect style of airbrush if you are using thin to thicker viscosity or pearlized spray materials by hobbyists or professional painters. A perfect versatile brush type for general-purpose usage using only one airbrush. The typical sizes of needles for this would be between 0.3mm – 0.45mm.
Effortless Coverage
For spraying medium range detail and coverage area with generally great atomisation at low air pressures. Ideal for beginner to high-level airbrush skills. Usually used by both hobbyists and professionals. The typical sizes of needles for this would be between 0.35mm – 0.4mm.
Full Finish
Generally, the widest spraying pattern and can be used for extra wide coverage areas. Perfect for a smooth finish over those larger areas and ideal for beginner to high-level airbrush skills. Usually used by both hobbyists and professionals. The typical sizes of needles for this would be between 0.4mm – 0.5mm.

Now you have a greater understanding of the types of airbrushes and how they work you can find our range of airbrushes here! If you have any other questions, you can always call us and talk to one of our staff. We are always more than happy to help with any questions you have about your airbrush or choosing the right one for you!
The majority of the information provided above is by the blog from Anest Iwata, a leading brand in spray guns and atomising technology. To check out all of the blogs I have used you can take a look at them on the links below:
Learn The 5 Ways To Spray
Airbrush Basics